
In this tutorial, we use Wrangler and Cloudflare Workers to deploy and serverless serve a static site developed in React.
Category: Tutorials Page 1 of 2

One of the daily routines administrators do is to monitor their web server logs for various interesting things: response codes (i.e. 500), attempts to access restricted pages, user-agents, ips, popular pages, even image hotlinking from other sites. In Linux servers, this can be easily done through shell one-liners involving various tools (tail, awk, sort, cut etc). Here is a bash script I use which automates apache monitoring for a given website.
Virtual mailboxes is a clear choice if you want to setup your mail server with multiple domains and non-Linux accounts. Of course, there are other and easier ways to setup Postfix for hosting multiple domains.
The most simple is to host additional (shared) domains by adding them to the ‘mydestination’ variable in postfix’s main.cf. But that solution lacks distinction between canonical and hosted domains ([email protected] is delivered to the same unix account as [email protected]).
A better approach is through “virtual aliases”, which allow separate domains and email addresses. For that, you only need to configure two parameters: ‘virtual_alias_domains = domain1.com domain2.com’ and ‘virtual_alias_maps = hash:/etc/postfix/virtual’. You declare the list of your hosted domains in the first and alias each one to a local linux account with the second (i.e. in /etc/postfix/virtual add “[email protected] root” to have mails sent to domain1.com’s postmaster delivered to root). However, this is not an optimal solution if you plan to host more and more domains or if you just don’t want to give shell access to your server.
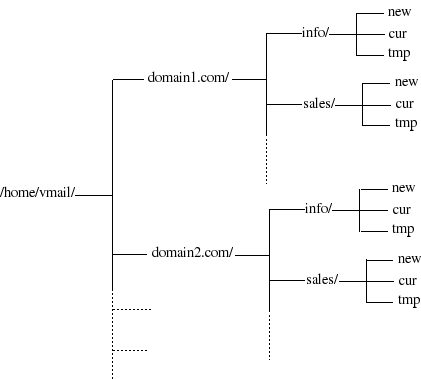
The really best solution is to use the Postfix virtual mailbox delivery agent. With this approach, every email address has its own virtual mailbox and you need to setup only one system account (to be the owner of all mailboxes). And each domain’s mailboxes are properly arranged in the file system under the home dir of the owner account:
In this how-to, I describe the process that I followed to setup virtual mailboxes in my postfix server for a pet project of mine.
Over the last weeks, the Social Networks Visualizer (SocNetV) project has released two new versions which brought useful new features and of course a lot of bugfixes. The latest v1.4 closed even 4 years old bugs!

socnetv-v1.4-erdos-random-social-network
The strongest new feature of SocNetV is multirelational editing. You can now load or create a social network on the canvas, for instance depicting the friendship ties between kids in a classroom, and then add a new relation (Cltr+Shift+N) which it might depict i.e. “likes” between pairs of the same clasroom kids. And you can be do this very easily as we will demonstrate in this article.

What is Varnish?
Varnish Cache or just Varnish is an open-source HTTP accelerator and caching reverse proxy for web servers, like Apache or nginx, hosting content-heavy dynamic web sites. In non-geek speak, Varnish is an free program which runs in front of your web server (which in this context is called backend or origin) and stores (caches) a copy of each webpage served by the web server. When a user requests a cached page, Varnish steps in and serves the cached copy instead of requesting the same page again and again from the backend server. So Varnish is ideal for developers who run high traffic sites with lots of visitors and like their web application to be highly available and running fast. This how-to is an attempt to present a comprehensive but simple introductory guide to Varnish configuration for web developers who want to scale their projects gracefully.
So, I had this EeePC 701 4G waiting patiently in a box and decided to make something useful with it: A media server + a remote torrent client.
First things first, I decided to install Lubuntu 13.04 in our EeePC. It is a simple, light but ‘full’ linux distro, since it is 100% compatible with Ubuntu. I downloaded the alternate ISO, burned it to a USB flash and rebooted the machine. The installation was smooth (it took ~40 minutes) and after rebooting to LXDE I was happy to see 1GB of free space in the 4GB SSD disk. Furthermore, everything worked OK: sound, graphics, greek support, etc. It was time to start the real fun part…
Do you need to connect to a Windows VPN from Linux command line? It’s simple even though the Point-to-Point Tunneling Protocol (PPTP) is proprietary. First, install the pptp client for the linux command line:
sudo apt-get install pptp-linux |
Then create a new file called chap-secrets, inside /etc/ppp:
sudo vim /etc/ppp/chap-secrets |
This file is where your VPN username and password will be kept. Add this line to it:
your_username PPTP your_password * |
Apparently, you need to change ‘your_username’ and ‘your_password’ to your own. The ‘PPTP’ is just a name you give to remote server. You might want to change it to something else. It doesn’t really matter.
Next, create the basic configuration file for pptp-linux. This file must be kept inside /etc/ppp/peers but you can name it anyway you want. Let’s say, you name it ‘cnc’:
sudo vim /etc/ppp/peers/cnc |
Inside the new file, add the following lines:
pty "pptp REMOTE_SERVER_IP --nolaunchpppd" name your_username #use the same name you used in chap-secrets remotename PPTP #use the same remote name you used in chap-secrets ipparam cnc #use the same name you used in naming this file require-mppe-128 #encrypt all traffic using 128-bit encryption file /etc/ppp/options.pptp #use standard PPP options when connecting |
Apparently, you need to change REMOTE_SERVER_IP to the IP address of your VPN server.
Finally, create a new script inside /etc/ppp/ip-up.d to route traffic through the new ppp0 device. This script will be running every time ppp is up. Use any filename you like. I used ‘my_traffic’.
sudo vim /etc/ppp/ip-up.d/my_traffic |
As you see in this example, I use 10.172.16.0/24 to force the kernel to route all packets directed to the IP range 10.172.16.0 – 10.172.16.254 to go through PPTP:
#!/bin/bash route add -net 10.172.16.0/24 dev ppp0 |
Apparently, you need to change the ‘10.172.16.0’ part with the IP range of your remote network.
That’s all! Connect with this simple command:
sudo pon cnc |
In parallel, you can watch for PPTP messages with
tail -f /var/log/syslog |
You need to see something like that:
Sep 14 02:09:30 vaio pppd[4516]: local IP address 10.172.16.249 Sep 14 02:09:30 vaio pppd[4516]: remote IP address 10.49.217. |
This means that you have acquired a VPN IP and you are probably OK. Check ifconfig to be sure.
If you manage to connect to your VPN, you will be able to ping to the above IP range, ssh to them, etc, just like as you were in office.
When you are done, disconnect with this command:
sudo poff cnc |