
Virtual mailboxes is a clear choice if you want to setup your mail server with multiple domains and non-Linux accounts. Of course, there are other and easier ways to setup Postfix for hosting multiple domains.
The most simple is to host additional (shared) domains by adding them to the ‘mydestination’ variable in postfix’s main.cf. But that solution lacks distinction between canonical and hosted domains ([email protected] is delivered to the same unix account as [email protected]).
A better approach is through “virtual aliases”, which allow separate domains and email addresses. For that, you only need to configure two parameters: ‘virtual_alias_domains = domain1.com domain2.com’ and ‘virtual_alias_maps = hash:/etc/postfix/virtual’. You declare the list of your hosted domains in the first and alias each one to a local linux account with the second (i.e. in /etc/postfix/virtual add “[email protected] root” to have mails sent to domain1.com’s postmaster delivered to root). However, this is not an optimal solution if you plan to host more and more domains or if you just don’t want to give shell access to your server.
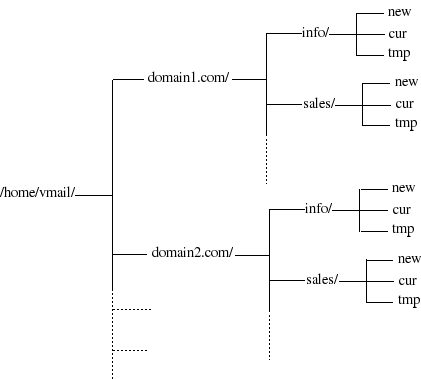
The really best solution is to use the Postfix virtual mailbox delivery agent. With this approach, every email address has its own virtual mailbox and you need to setup only one system account (to be the owner of all mailboxes). And each domain’s mailboxes are properly arranged in the file system under the home dir of the owner account:
In this how-to, I describe the process that I followed to setup virtual mailboxes in my postfix server for a pet project of mine.
First, install Postfix and Mailutils (for the mail command we’ll be using for test purposes)
sudo apt-get install postfix mailutils
Choose “Internet Site” when the configuration ask for it.
Configuring Postfix
Next, we configure Postfix. This is done in the /etc/postfix/main.cf file:
sudo vim /etc/postfix/main.cf
In that file add these lines near the top:
home_mailbox = Maildir/
mailbox_command =
Also, make sure you have some lines like the following (most probably Debian has already setup all of them):
myhostname =
alias_maps = hash:/etc/aliases
alias_database = hash:/etc/aliases
mydestination =
myorigin = /etc/mailname
relayhost =
mynetworks = 127.0.0.0/8 [::ffff:127.0.0.0]/104 [::1]/128
inet_interfaces = all
Now, you need to add a few more lines to setup Postfix to use virtual mailboxes:
virtual_mailbox_domains = /etc/postfix/vhosts
virtual_mailbox_base = /home/vmail
virtual_mailbox_maps = hash:/etc/postfix/vmaps
virtual_minimum_uid = 1000
virtual_uid_maps = static:5000
virtual_gid_maps = static:5000
virtual_alias_maps = hash:/etc/postfix/virtual
The ‘virtual_mailbox_domains’ parameter is where we declare our hosted domains to be virtual mailboxes in Postfix. You can just list them directly there but, for convenience, create /etc/postfix/vhosts and add your domains line by line in that file:
sudo vim /etc/postfix/vhosts
# Obviously, use your real domain names here:
domain1.com
domain2.com
The next parameter ‘virtual_mailbox_base’ is a prefix for all virtual mailbox pathnames (see below). So, ‘/home/vmail’ is the base directory where our mail will be stored. You can use whatever you wish (but remember your choice when you create the ‘owner’ user of your mail, see below).
In the ‘virtual_mailbox_maps’ parameter we specify the file which will act as lookup table for our email addresses mailbox (maildir in our case) pathnames. That file is a simple two-column text file. In the first column you specify an email address and in the second you define the location of the corresponding mailbox (relative to ‘virtual_mailbox_base’).
sudo vim /etc/postfix/vmaps
[email protected] domain1.com/info/
[email protected] domain1.com/sales/
[email protected] domain1.com/info/
Note the slash / in the end of each path. That slash designates a Maildir format – if you omit the slash, it will use the mbox format. Prefer the Maildir format over mbox, as it keeps emails in separate files, allows for multiple applications to read mail, etc. As you see in the third line, you can declare aliases here as well, i.e. to have webmaster delivered to info’s mailbox. You don’t need to create the directory structure yourself; it is automagically created when each user gets the first email.
After you save the file, source it with:
sudo postmap /etc/postfix/vmaps
The rest of the parameters are also essential:
‘virtual_minimum_uid’ specifies a lower bound on the mailbox or maildir owner’s UID as a safety mechanism.
‘virtual_uid_maps’ and ‘virtual_gid_maps’ specify that all mailboxes will be owned by a used with uid and gid 5000. We will create that user below.
‘virtual_alias_maps’ allows us to mix virtual aliases with virtual mailboxes. For instance, we can have domain1’s postmaster mails delivered to [email protected] or local postmaster or root or even an external email address.
sudo vim /etc/postfix/virtual
[email protected] [email protected] [email protected]
[email protected] [email protected]
[email protected] [email protected]
[email protected] [email protected]
Again, once you edit the file, you need to source it:
sudo postmap /etc/postfix/virtual
Create the owner user
Now, we have finished configuring Postfix but we also need to create the system user which will be the owner of our mailboxes. Let’s name that user ‘vmail’:
sudo groupadd -g 5000 vmail
sudo useradd -m -u 5000 -g 5000 -s /bin/false vmail
The former command creates a named group while the latter creates the user with the desired uid/gid 5000 and its home dir in /home/vmail.
Test it
We are done! Just restart Postfix:
sudo /etc/init.d/postfix restart
We can test our setup locally by sending an email i.e. to [email protected]
mail [email protected]
Enter a Subject, press enter, write something, press enter, write a full stop (.) and you’re done. The mail should be delivered to /home/vmail/domain1/info/new – you should see a plain text file there.
Have fun!
Mail did not deliver? Check your DNS settings!
If your test mail did not delivered as expected, you probably need to setup the dns records of your domain. Add an MX record to point your mail server and add a TXT record as follows:
“v=spf1 a mx ip4:
Use tail -f /var/log/mail.log to see the Postfix log for any errors.
References
See these links for more:
http://www.postfix.org/VIRTUAL_README.html
https://wiki.debian.org/Postfix
https://help.ubuntu.com/community/PostfixVirtualMailBoxClamSmtpHowto
https://help.ubuntu.com/community/PostfixBasicSetupHowto


oneirokritis
test
oneirokritis
Useful post.